How To Root And Install Custom Recovery In Samsung Galaxy E7 (TWRP)
Learn How To Root And Install TWRP Recovery In Samsung Galaxy E7, If you want to explore more and extra amazing features in your Samsung Galaxy E7, then you have to simply Root your Samsung Galaxy E7, here you will learn how to root your Samsung Galaxy E7 easily. Also learn how to install custom Recovery [Cwm, TWRP, CTR, PhilZ recovery] in Samsung Galaxy E7.
Rooting
Rooting is a process to unlock your android device, by simply install a custom binary in your android smartphone, and to get a superuser permission to access more locked features of your android. In android rooting is a superuser permission, like in windows you have to accept "User Account Control" to run programs. Now these days everyone knows about rooting and they want to root their phone but sometimes they failed to root their android smartphone, I am gonna tell you to how to root and install custom recovery in your Samsung Galaxy E7 with PC.
Custom Recovery
Custom Recovery means a recovery which can be installed in any android phone in place of Stock recovery, custom recovery is always better than stock recovery which is provides by device manufacturer. now there are too many custom recoveries are available for android smartphones, [Eg- CWM- clockword mod recovery, TWRP recovery, CTR, PhilZ recovery, etc] Lets know advantages and disadvantages of installing a custom recovery in any android device:
Advantages of Installing Custom Recovery
Disadvantages Of Installing Custom Recovery
If anything comes with too many advantages, it has little disadvantages also.
Pre Requirements Before Root And Install Custom Recovery In Samsung Galaxy E7
Make sure you've check all the above requirements For rooting your Samsung Galaxy E7 that I've listed, all the downloads- Odin, USB Drivers and Custom Recovery, it comes with in a zip format you have to extract all the files before using. you can extract these files with 7Zip, if you don't have 7Zip then download it from here.
For Rooting and install custom recovery in Samsung Galaxy E7, check once again all the requirements, if you've done then go further and follow carefully the given steps:
Step1.
After installing USB Drivers in your PC or Laptop, Reboot your Samsung Galaxy E7 into Download mode by pressing Home button + Power Button + Volume Down key at a same time for 3-4 seconds until its goes to Download mode, and select continue for flashing process.
Step2.
Now Open Odin.****.exe and after reboot your device in download mode connect it with your PC with help of a data cable, after connecting Odin will indicate you a message "Added" and ID: COM port on Odin will turn Blue or Yellow depending on Odin's version, that also means Odin tool is ready for flashing Custom Recovery.
Step3.
Now Click on AP or PDA for selecting your Custom Recovery that is in .tar or .tar.md5 extension, simply select it and now click on start option on Odin, and leave all settings remain, you have to check only "Auto Reboot" and "F. Reset Time" and leave all settings unchecked, after clicking on start button your flashing process will be start and it takes 5-7 minutes, and when its completed, it will indicate a message PASS on Odin, your device will be automatically Reboot and restart in few minutes, keep patience and do not unplug before its complete, check in below image:
Note:-
Rooting might softbrick your samsung galaxy E7, Do at Your Own Risk. After Rooting your Samsung Galaxy E7, your Warranty may void, and if you want to get its warranty back then Unroot it by simply flashing Stock ROM in your Samsung Galaxy E7.
Thanks for reading, The tutorial was about How To Root Samsung Galaxy E7, and How To Install Custom recovery In Samsung Galaxy E7, If you find it helpful, or if you are facing any problem then do comments.
In Search Tearms:-
Root galaxy E7 xda,
Root Glaxy E7 E700F,
Root Samasung Galaxy E700F,
How to Root Samsung galaxy E7,
Download Twrp recovery for Samsung Glaxy E7,
Root Samsung Galaxy E7 Without PC
Rooting
Rooting is a process to unlock your android device, by simply install a custom binary in your android smartphone, and to get a superuser permission to access more locked features of your android. In android rooting is a superuser permission, like in windows you have to accept "User Account Control" to run programs. Now these days everyone knows about rooting and they want to root their phone but sometimes they failed to root their android smartphone, I am gonna tell you to how to root and install custom recovery in your Samsung Galaxy E7 with PC.
- How To Root Any Android Phone Without PC~ Top 10 Root Apps
- Top 30 Best Root Apps For Rooted Android Phones 2016 (NEW)
- How To See Saved LOGIN ID Or Password On Android Phones, using Sqli Editor
Custom Recovery
Custom Recovery means a recovery which can be installed in any android phone in place of Stock recovery, custom recovery is always better than stock recovery which is provides by device manufacturer. now there are too many custom recoveries are available for android smartphones, [Eg- CWM- clockword mod recovery, TWRP recovery, CTR, PhilZ recovery, etc] Lets know advantages and disadvantages of installing a custom recovery in any android device:
Advantages of Installing Custom Recovery
- We can root android smartphone easily after installing custom recovery.
- We can install zip files directly with custom recovery.
- Custom recovery allows user to install a custom ROM in android device, which is better than stock ROM [Sometimes ;)].
- Custom recovery allows user to control over partition of sdcard.
- Custom recovery allows user to control over mounts and storage of android smartphone.
Disadvantages Of Installing Custom Recovery
If anything comes with too many advantages, it has little disadvantages also.
- Installing Custom recovery is a risky process, your device might bricks [Sometimes ;)].
- After installing custom recovery do not reset your phone from settings, if you want to reset it then go to your custom recovery and do a wipe data, otherwise it may softbrick your android smartphone.
- Custom recovery is big reason for Bootloop problems in any android devices.
- Top 8 Major Reasons For Any Soft-Bricked Android Smartphone (How To Avoid)
- Chamelephon: Easiest Way To Fix Invalid IMEI Problem In Any Android Phone(MTK Devices)
Pre Requirements Before Root And Install Custom Recovery In Samsung Galaxy E7
- A Laptop or PC.
- A Data Cable.
- Make sure USB Debugging and OEM Unlock is is enabled in your android phone. (Settings > About Phone > Tap on Build Number up to 7 times after it you got a developer options in your settings enable USB debbuging and OEM Unlock from here.)
- Make sure your phone's battery is charged over 60%.
- A patience mind: Before root and install custom recovery in your Samsung Galaxy E7, I wanna highly recommend you to keep patience, its very easy process.
- Download Odin Flash Tool- Odin 3.09 (this is a zip file, first extract it to use)
- Download USB Driver- USB driver (this is a zip file, first extract it to use)
- SuperSU- Download it from here
- TWRP Recovery- Download For KitKat Devices And For Lollipop Devices
- Must Install USB Driver In your Laptop or PC before rooting Samsung Galaxy E7.
Make sure you've check all the above requirements For rooting your Samsung Galaxy E7 that I've listed, all the downloads- Odin, USB Drivers and Custom Recovery, it comes with in a zip format you have to extract all the files before using. you can extract these files with 7Zip, if you don't have 7Zip then download it from here.
How To Root And Install TWRP Recovery In Samsung Galaxy E7
How To Install TWRP Recovery In Samsung Galaxy E7
For Rooting and install custom recovery in Samsung Galaxy E7, check once again all the requirements, if you've done then go further and follow carefully the given steps:
Step1.
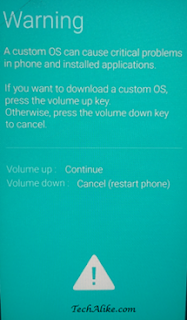
After installing USB Drivers in your PC or Laptop, Reboot your Samsung Galaxy E7 into Download mode by pressing Home button + Power Button + Volume Down key at a same time for 3-4 seconds until its goes to Download mode, and select continue for flashing process.
 |
| Download Mode:- Galaxy E7 |
Step2.
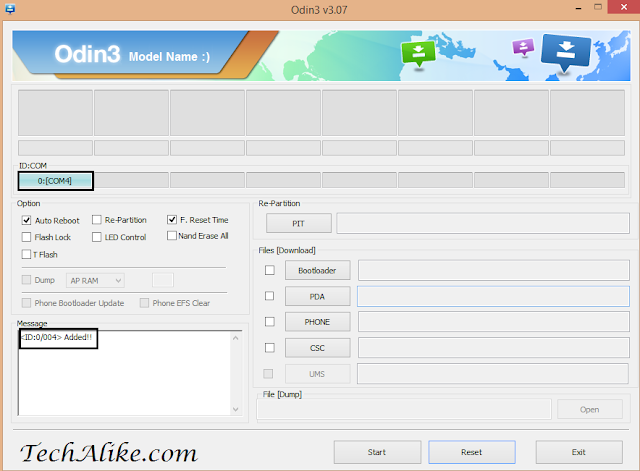
Now Open Odin.****.exe and after reboot your device in download mode connect it with your PC with help of a data cable, after connecting Odin will indicate you a message "Added" and ID: COM port on Odin will turn Blue or Yellow depending on Odin's version, that also means Odin tool is ready for flashing Custom Recovery.
Step3.
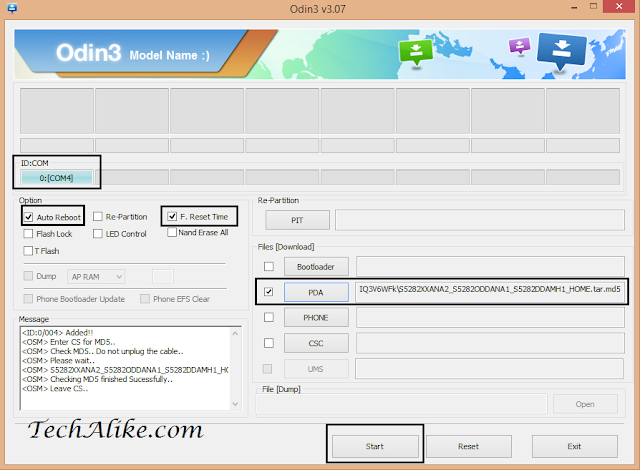
Now Click on AP or PDA for selecting your Custom Recovery that is in .tar or .tar.md5 extension, simply select it and now click on start option on Odin, and leave all settings remain, you have to check only "Auto Reboot" and "F. Reset Time" and leave all settings unchecked, after clicking on start button your flashing process will be start and it takes 5-7 minutes, and when its completed, it will indicate a message PASS on Odin, your device will be automatically Reboot and restart in few minutes, keep patience and do not unplug before its complete, check in below image:
How To Root Samsung Galaxy E7
- After Installing custom recovery in your Samsung Galaxy E7, Place SuperSU Zip file in your sdcard.
- Now go to your recovery mode by pressing Volume UP key + Power Button + Home Button at a same time for 3-4 seconds until its go into recovery mode.
- Now select "Install Zip from sdcrad" and choose your SuperSU zip from of your sdcard and install it
- Now press back and Reboot your Device, Thats it! you're all done! Your Samsung Galaxy E7 is Rooted now. Enjoy!
Note:-
Rooting might softbrick your samsung galaxy E7, Do at Your Own Risk. After Rooting your Samsung Galaxy E7, your Warranty may void, and if you want to get its warranty back then Unroot it by simply flashing Stock ROM in your Samsung Galaxy E7.
Conclusion
Thanks for reading, The tutorial was about How To Root Samsung Galaxy E7, and How To Install Custom recovery In Samsung Galaxy E7, If you find it helpful, or if you are facing any problem then do comments.
In Search Tearms:-
Root galaxy E7 xda,
Root Glaxy E7 E700F,
Root Samasung Galaxy E700F,
How to Root Samsung galaxy E7,
Download Twrp recovery for Samsung Glaxy E7,
Root Samsung Galaxy E7 Without PC


Comments
Post a Comment
Have any question?, Do comments,
I will reply you all not immediately, but definitely.